
Shop
Showing 1297–1308 of 1312 results
- You cannot add "Z-Bar – BBB Z Bar & 1″ Engine Ball Stud" to the cart because the product is out of stock.
Sale!
 $20.00
Add to cart
$20.00
Add to cart
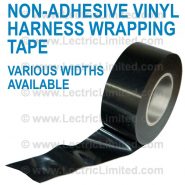
Wire Harness Tape
1" Wide Non Adhesive Harness Tape
Source - Lectric Limited
Note: We use & sell Lectric Limited Products because they’re Made in the USA using Factory GM Blue Prints!

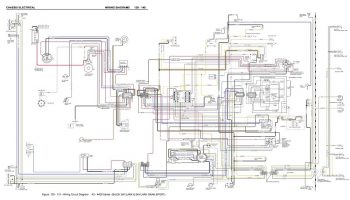
Wiring Diagram – 1967
We've replicated the GM Chassis Manual Wiring Diagram into a Poster Size Diagram so it's easy to read.
These measure 24" x 36" and are color coded just like the originals. These are nice quality and easy to read!
Again, these are from the Factory Wiring Diagram, not some bootleg diagram that's been reprinted 1,000's of times.
If you have a wiring issue or just want to know what wires do what this is a great tool to have!
Photo Below Shows the 1970 Diagram just for reference . . .
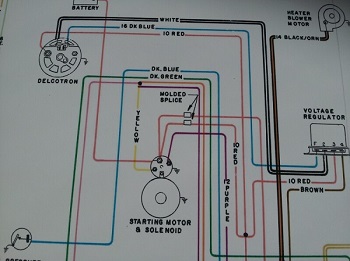
 Close up Photo Below shows the clarity and detail . . . .
 .
.
Close up Photo Below shows the clarity and detail . . . .
. Wiring Diagram – 1968
We've replicated the GM Chassis Manual Wiring Diagram into a Poster Size Diagram so it's easy to read.
These measure 24" x 36" and are color coded just like the originals. These are nice quality and easy to read!
Again, these are from the Factory Wiring Diagram, not some bootleg diagram that's been reprinted 1,000's of times.
If you have a wiring issue or just want to know what wires do what this is a great tool to have!
Photo Below Shows the 1970 Diagram just for reference . . .
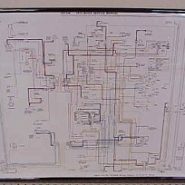
Close up Photo Below shows the clarity and detail . . . .
.
Close up Photo Below shows the clarity and detail . . . .
. Wiring Diagram – 1969
We've replicated the GM Chassis Manual Wiring Diagram into a Poster Size Diagram so it's easy to read.
These measure 24" x 36" and are color coded just like the originals. These are nice quality and easy to read!
Again, these are from the Factory Wiring Diagram, not some bootleg diagram that's been reprinted 1,000's of times.
If you have a wiring issue or just want to know what wires do what this is a great tool to have!
Photo Below Shows the 1970 Diagram just for reference . . .
Close up Photo Below shows the clarity and detail . . . .
.
Close up Photo Below shows the clarity and detail . . . .
. 
Wiring Diagram – 1970, 71, 72
We've replicated the GM Chassis Manual Wiring Diagram into a Poster Size Diagram so it's easy to read.
These measure 24" x 36" and are color coded just like the originals. These are nice quality and easy to read!
Again, these are from the Factory Wiring Diagram, not some bootleg diagram that's been reprinted 1,000's of times.
If you have a wiring issue or just want to know what wires do what this is a great tool to have!
Note: 1970 - 1972 were the same exact diagram other than a seat belt warning light added in 1972.
So with that being said anyone ordering a 1970, 71 or 72 will simply receive the "72" diagram.
Photo Below Shows the 1970 Diagram just for reference . . .
Close up Photo Below shows the clarity and detail . . . .
Close up Photo Below shows the clarity and detail . . . .
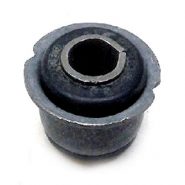
Z Bar Bushing for 455 Cars
This is the Correct bushing used in the Clutch Fork Assembly as well as the Z-Bar.
Fits 1970 – 1972 (and maybe some earlier 4 speed models)
Note: In some cases we've had to file the Inside Collar down just a tad to get a perfect fit.
.
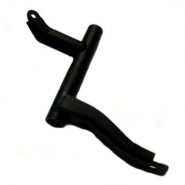
Z-Bar – 350 Equipped Cars
Reproduction Z-Bar for the 350 Equipped Cars
Fits 1968 - 1972
.
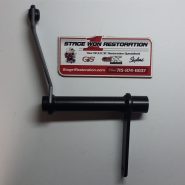
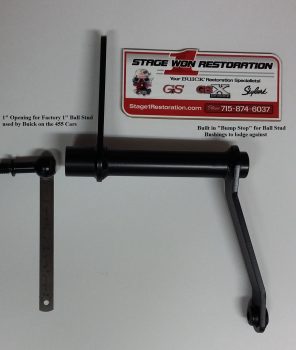
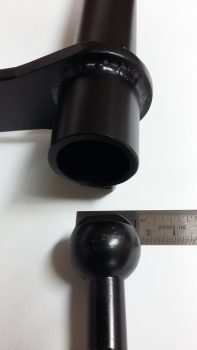
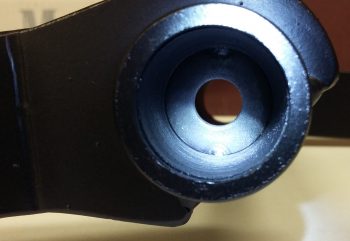
Z-Bar – BBB Z Bar with 1″ opening for Factory Engine Ball Stud
We have some Big Block Buick Z-Bars along with the reproduction Ball Studs that are the correct size for your Buick!
Buick used there own 1" size when it came to the Engine Ball Stud and Z-Bar.
Originals are super hard to find simply because Buick didn't produce a lot of 4 speed cars like the other GM Manufactures.
This is also the reason why none of the Big Companies will reproduce them. (Not enough potential sales)
Note: Our Z Bar is the only one on the market featuring the 1" opening for the Engine Ball Stud.
It's also the only one on the market with a "Bump Stop" for your Ball Stud Bushing to lodge against.
Clutch Rod Bushing is also included and installed.
You may find these for less money but they will not have these Key Features!
Feel free to call me on these 4 Speed parts prior to purchasing since it is confusing.
Photo below shows a Factory Z-Bar on the Left and our Version on the Right.

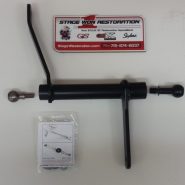
Z-Bar – BBB Z Bar & 1″ Engine Ball Stud
This Kit includes the following items:
- Big Block Z-Bar with Modified 1″ Opening, Clutch Rod Bushing & Bump Stop already Installed
- 1″ Engine Ball Stud
Z-Bar – BBB Z Bar and both Ball Studs
This Kit includes the following items:
- Big Block Z-Bar with Modified 1″ Opening, Clutch Rod Bushing & Bump Stop already Installed
- 1″ Engine Ball Stud
- Frame Ball Stud w/Muncie Rebuild Kit
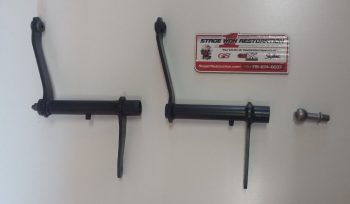
Z-Bar – Clutch Fork – Ball Studs – Adjustment Rod
This is our 2nd most complete Kit including our Big Block Z-Bar and Clutch Fork
You'll get the following:
- Big Block Z-Bar with Modified 1″ Opening, Clutch Rod Bushing & Bump Stop already Installed
- Big Block Clutch Fork
- 1" Engine Ball Stud
- Frame Ball Stud w/Muncie Rebuild Kit
- Custom Adjustment Rod (A tad longer than stock for more adjustment)
- Clutch Fork Bushing and 2) Retainer Pins
Z-Bar – Clutch Fork – Ball Studs – Adjustment Rod – Clutch Rod
This is our most complete Kit including our Big Block Z-Bar and Clutch Fork
You'll get the following:
- Big Block Z-Bar with Modified 1″ Opening, Clutch Rod Bushing & Bump Stop already Installed.
- Big Block Clutch Fork
- Big Block Clutch Rod
- 1" Engine Ball Stud
- Frame Ball Stud w/Muncie Rebuild Kit
- Custom Adjustment Rod (A tad longer than stock for more adjustment)
- Clutch Fork Bushing and 2) Retainer Pins